
In this tutorial, we will introduce an approach for handling a large amount of screenshots using Globalization Pipeline's auto-association functionality.
To begin, you need to generate a pseudo translation with a unique string ID and obtain a UI screenshot from the pseudo build. Then, using the command line interface tool, you can upload these screenshots to Globalization Pipeline. The tool leverages OCR to match the specific pseudo string, and Globalization Pipeline will automatically associate the screenshot with the corresponding resource string.
In the upcoming sections, we will present comprehensive instructions on how to create attachments, upload them, and link them with resource strings using Globalization Pipeline command line interface tool and OCR. To achieve auto-association, the following main steps need to be performed.
Step1 - Create pseudo build
1. Generate English (XP) pseudo translation
With pseudo build in development environment, Globalization Pipeline provides a way to perform the association automatically by leveraging OCR technology. Globalization Pipeline provides a special machine translation that adds unique entry ids to the resource strings. By capturing and uploading the pseudo screenshots, we use OCR to identify the the resource strings on the screenshots and help to create the association automatically.
-
For new bundles
If you want to create a new bundle, you can add pseudo language (English XP) and upload latest resource file in bundle creation page. Note that there are two kinds of "pseudo languages" provided in Globalization Pipeline. The "English (Pseudo-Accents)" is used mainly for the GVT testing purpose, and "English (XP)" is the one used for Globalization Pipeline to perform auto-association for the screenshot attachments.

- For existing bundles
If you have an existing bundle, you can upload the latest resource file and add pseudo language
a. Upload the latest resource file to bundle.

b. Click on Add language menu item in bundle-language view to add the pseudo language

c. in Add language dialog, pick English(XP) in the Pseudo languages accordion.

d. When pseudo language is added, Globalization Pipeline will generated the pseudo string with a unique entry id. You would able to see English (XP) language is added in bundle language view.

e. When you click on English(XP) language, you can find the pseudo translation will be formatted as
$<%pseudo id%>#<%Original String%>
Globalization Pipeline will take the pseudo string as a hook to help to identify the exact string, and create the association between attachments and resource strings.


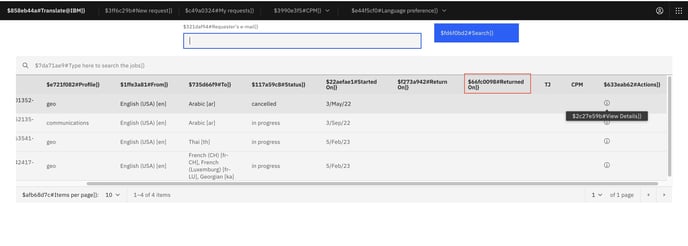
Take the following screen shot as an example, the pseudo string $66fc0098#{[Returned On]} found in bundle is showed in the UI screenshot taken on pseudo build. (The highlight string in the screenshot below.)
- Create pseudo language for multiple bundles at a time
If you want to add pseudo language for multiple bundles at a time, you can use Globalization Pipeline command line interface tool (gp-cli) to do so.
a. For new bundles, you can use create command to change the language included.
The parameters you can specify:
-
-
-
-
-
-b to provide a bundle name that you want to create.
-
-l to provide a list of language ids you want to add in this bundle.
-
-j point to a credential file.
-
-
-
-
java -jar ./gp-cli-latest.jar create -b translations.json -l en,en-XP -j ./DemoSiteCredentail.json
b. For existing bundles, you can use update command to change the language included.
The parameters:
-
-
-
-
-
-b to provide a bundle name that you want to update.
-
-l to provide a list of target language ids you want to include in this bundle. You need to included all the existed languages in the language id list, but source language en is not needed.
-
-j point to a credential file.
-
-
-
-
java -jar ./gp-cli-latest.jar update -b translations.json -l en-XP -j ./DemoSiteCredentail.json
2. Download pseudo translation file for build kitting
Users can download pseudo translation from dashboard or use the Globalization Pipeline command line tool to download it.
Refer to Globalization Pipeline command line interface tool export command for reference.
3. Create the pseudo build using the pseudo translation file
Different projects may use different localization strategies and language switcher, pseudo build kitting will varies on different framework. One common practice is to replace resource files in one of languages' folder with pseudo translation files, then kick a pseudo build for screenshots. Another practice is to add special flag on the product URL to turn on and off the pseudo translation on product UI.
Step2 - Capture both English and Pseudo UI Screenshots
To capture the screenshots for English and Pseudo UI, we suggest to use automation to complete the tasks. For screenshot specification, please refer to How-to - Prepare screenshots . We suggest to keep the mapping of the attachment ID to the screenshots. You may use the attachment id as the folder name and put the language screenshots images like en and en-XP under the folder. This helps you to better organize the screenshots. Once the screenshots are ready, user can upload them to Globalization Pipeline to trigger auto-association.
Step3 - Upload the screenshots & trigger auto-association
In Globalization Pipeline, all of the reference information including screenshots can be stored as attachment. To upload the screenshots, users need to create an attachment first, then upload content to it.
For each screenshot, we would create an attachment container to hold to contain all of the language screenshots. For example, we have 10 different screenshots to be attached in a translation request containing 5 languages, we would need to create 10 attachments and upload 5 screenshots for each of the attachment.
1. Create the attachments
When there is a large amount of attachments, you can use Globalization Pipeline command line interface tool to do bulk creation and upload to save your time.
a. To do bulk attachment creation, you will need to prepare an attachment list file, with one attachment ID per line.
-
-
- Before Globalization Pipeline command line interface tool v2.2.7, the format of AttachmentIDList.txt is as below.
CPMSearch-01
QuickTranslation-01
- Before Globalization Pipeline command line interface tool v2.2.7, the format of AttachmentIDList.txt is as below.
-
-
-
- For Globalization Pipeline command line interface tool v2.2.8 later, it supports multiple format and descriptions in a single attachment id list. The sample file is as below.
CPMSearch-01,image/png,Search Panel in CPM component
QuickTranslation-01,image/gif,Quick Translation Panel
- For Globalization Pipeline command line interface tool v2.2.8 later, it supports multiple format and descriptions in a single attachment id list. The sample file is as below.
-
b. Then you need to run create-attachment command below to create all the attachments.
The parameters:
-
-
-
-al point to a text file with one attachmentId per line.
-
-t specify a content type.
-
-j point to a credential file.
-
-
-
- Prior to version 2.2.7 of the Globalization Pipeline command line interface tool, you were only able to create attachments of the same file type as the content, such as "image/jpeg", for each command.
java -jar ./gp-cli-latest.jar create-attachment -al ./AttachmentIDList.txt -t "image/jpeg" -j ./DemoSiteCredentail.json
- Prior to version 2.2.7 of the Globalization Pipeline command line interface tool, you were only able to create attachments of the same file type as the content, such as "image/jpeg", for each command.
-
- Starting from version 2.2.8, the content type and description are specified in the attachment list, and thus do not need to be specified in the command line.
java -jar ./gp-cli-latest.jar create-attachment -al ./AttachmentIDList.txt -j ./DemoSiteCredentail.json
- Starting from version 2.2.8, the content type and description are specified in the attachment list, and thus do not need to be specified in the command line.
2. Upload screenshots as attachment contents
a. To bulk upload the attachment content, just provide a list of attachment ID to screenshot file path mapping, one line per attachment, separated by comma.
# This is AttachmentImportXPList.txt

CPMSearch-01,/private/tmp/GPDemo/Screenshots/CPMSearch-01/en.jpg
QuickTranslation-01,/private/tmp/GPDemo/Screenshots/QuickTranslation-01/en.jpg
Note: To improve OCR performance, it is recommended to restrict the number of screenshots in each batch to less than 100.
b. Run the command below to create all the attachments in the same content type "image/jpeg"
The parameters
-
-
-al : This parameter should point to a text file with each line following the pattern <attachmentID>[,|@]<resource>, with some additional constraints:
-
e.g. attachment01,/path/to/attachmentImage.png for a normal attachment.
-
e.g. attachment02@https://ibm.com/path/to/resource for an external reference.
-
-
-j point to a credential file.
-
java -jar ./gp-cli-latest.jar import-attachment -al ./AttachmentImportXPList.txt -l en-xp -j ./DemoSiteCredentail.json
3. Auto association with pseudo screenshots
When we upload pseudo screenshots as attachment content to English(XP) locale, the auto association will be triggered automatically. It would take a while to complete the auto association. You can check the association result on the GP dashboard.
Step4 - Review the association result and make corrections as needed
Then we can sample check the linkage between string and attachment. Assuming you have a string that should be associated with one certain attachment. Assume we have a pseudo string $66fc0098#{[Returned On]} to locate in the bundles.
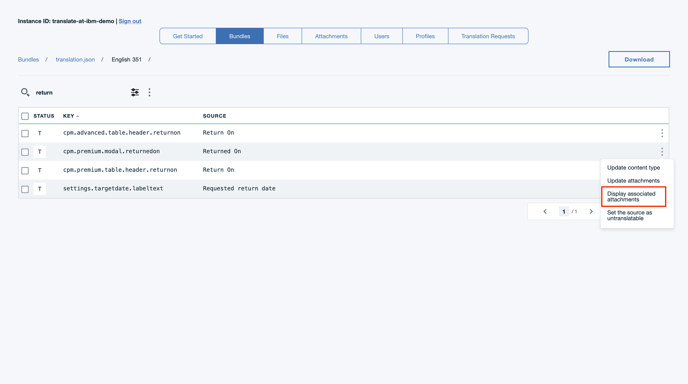
1. Review the association result
a. To review the association result, click on the bundle name, then select English language.
b. We input the the entry resource string "Returned On" in search field. From the overflow menu in the right hand side of the found string matched result, select "Display associated attachments"
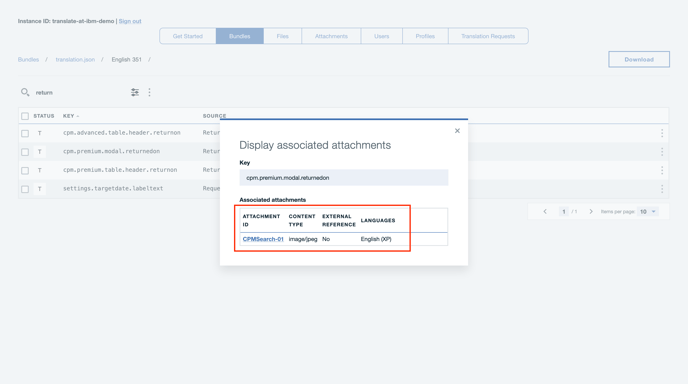
c. The associated attachment detail will show in the popup dialog.
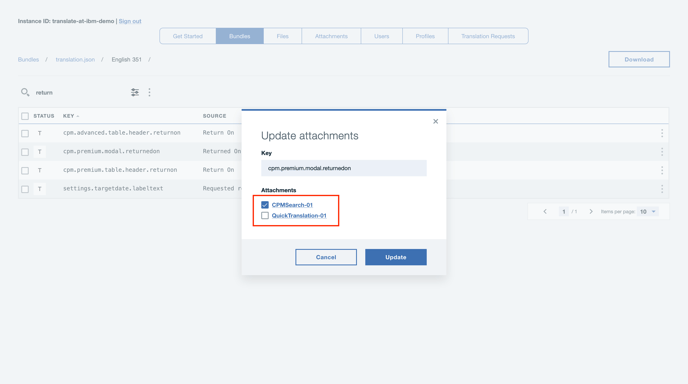
2. Update attachment association
If you want to add or remove any association to specific screenshot, it can be done through the Update dialog.
a. Follow the same steps in previous step to locate the string
b. From the overflow menu on the right hand side of the string, select the update attachments option. The update attachments dialog will popup , select the associations you want to add or remove.
Note:
- Note that having Pseudo screenshots is a prerequisite for using the screenshot auto-association functionality in Globalization Pipeline.
- For instructions to create screenshots from pseudo translation build, refer to How-to - Prepare screenshots
Reference
-
Globalization Pipeline Command line interface tool (Note: The attachment feature is available for the build after 2.2.3 version in release page.)