
Please go through Initial Setup if you haven't already.
Setup a project
1. Get the latest Jenkins plugin : git clone https://github.ibm.com/1t1p/ibm-g11n-pipeline-plugin. And add following settings.xml file in ${user.home}/.m2 folder:
<settings>
    <pluginGroups>
        <pluginGroup>org.jenkins-ci.tools</pluginGroup>
    </pluginGroups>

    <profiles>
    <!-- Give access to Jenkins plugins -->
        <profile>
          <id>jenkins</id>
          <activation>
            <activeByDefault>true</activeByDefault> <!-- change this to false, if you don't like to have it on per default -->
          </activation>
          <repositories>
            <repository>
              <id>repo.jenkins-ci.org</id>
              <url>https://repo.jenkins-ci.org/public/</url>
            </repository>
          </repositories>
          <pluginRepositories>
            <pluginRepository>
              <id>repo.jenkins-ci.org</id>
              <url>https://repo.jenkins-ci.org/public/</url>
            </pluginRepository>
          </pluginRepositories>
        </profile>
    </profiles>
    <mirrors>
        <mirror>
          <id>repo.jenkins-ci.org</id>
          <url>https://repo.jenkins-ci.org/public/</url>
          <mirrorOf>m.g.o-public</mirrorOf>
        </mirror>
    </mirrors>
    <servers>
        <server>
            <id>gp-central</id>
            <username>IBM w3id</username>
            <password>ARTIFACTORY API KEY</password>
        </server>
    </servers>
</settings>
*Note* In settings.xml file, you want to config Straker Maven Repository, please read Straker Maven Repository and refer to GP SDK-Tool Release .
2. Let's add our custom CSV filter - Simply Download the CSV Resource Filter jar file (Right click -> Save link as) and make sure to install it:
   mvn install:install-file \
     -Dfile=PATH_TO_csv-filter.jar \
     -DcreateChecksum=true \
     -DgroupId=com.ibm.g11n.pipeline \
     -DartifactId=csv-res-filter \
     -Dversion=2.0.0-SNAPSHOT \
     -Dpackaging=jar \
     -DgeneratePom=true
NOTE: Make the changes to the project as explained in these steps. Note that the version for csv-res-filter would be 2.0.0-SNAPSHOT if you are using the jar provided in this tutorial. Other changes might already be in place.
3. Run mvn clean install. This will generate target/ibm-g11n-pipeline.hpi - We will later use this to publish on your Jenkins environment if test works out for you.
4. To test this out locally, let's run mvn hpi:run. This will load Jenkins environment on http://localhost:8080/jenkins.
5. Create a Freestyle job and add a shell build step:
mkdir -p src/main/resources/csv
mkdir -p src/main/resources/csv/fr
mkdir -p src/main/resources/csv/ja
mkdir -p src/main/resources/json
mkdir -p src/main/resources/json/en
mkdir -p src/main/resources/json/fr
mkdir -p src/main/resources/json/ja
mkdir -p src/main/resources/properties

touch src/main/resources/csv/fr/test_demo.csv
touch src/main/resources/csv/ja/test_demo.csv
touch src/main/resources/csv/test_demo.csv
touch src/main/resources/json/en/test_demo.json
touch src/main/resources/json/fr/test_demo.json
touch src/main/resources/json/ja/test_demo.json
touch src/main/resources/properties/test_demo.properties
touch src/main/resources/properties/test_demo-fr.properties
touch src/main/resources/properties/test_demo-ja.properties

cat <<EOT >> src/main/resources/csv/fr/test_demo.csv
key,value
greetings,Bonjour!
day,Lundi
EOT

cat <<EOT >> src/main/resources/csv/ja/test_demo.csv
key,value
greetings,こんにちは!
day,月曜
EOT

cat <<EOT >> src/main/resources/csv/test_demo.csv
key,value
greetings,Hello there!
day,Monday
new_greetings,Goodbye!
new_id,User code is @@45 today
EOT

cat <<EOT >> src/main/resources/json/en/test_demo.json
{
    "greetings" : "Hello there!",
    "day" : "Monday",
    "new_greetings" : "Goodbye!",
    "new_id" : "User code is @@45 today"
}
EOT

cat <<EOT >> src/main/resources/json/ja/test_demo.json
{
    "greetings" : "こんにちは!",
    "day" : "月曜"
}
EOT

cat <<EOT >> src/main/resources/json/fr/test_demo.json
{
    "greetings" : "Bonjour!",
    "day" : "Lundi"
}
EOT

cat <<EOT >> src/main/resources/properties/test_demo.properties
greetings=Hello there!
day=Monday
new_greetings=Goodbye!
new_id=User code is @@45 today
EOT

cat <<EOT >> src/main/resources/properties/test_demo-ja.properties
greetings=こんにちは!
day=月曜
EOT

cat <<EOT >> src/main/resources/properties/test_demo-fr.properties
greetings=Bonjour!
day=Lundi
EOT
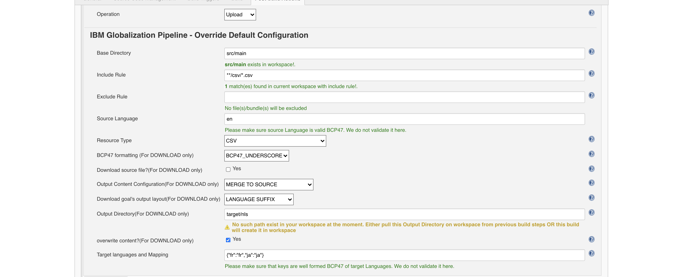
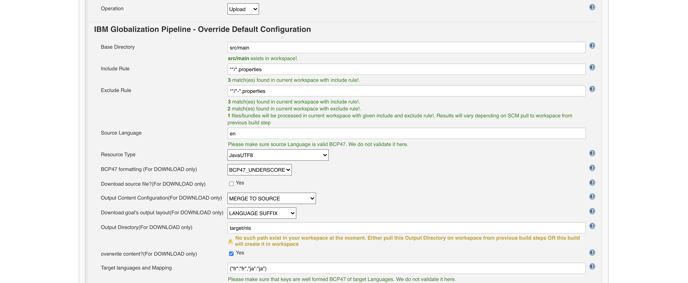
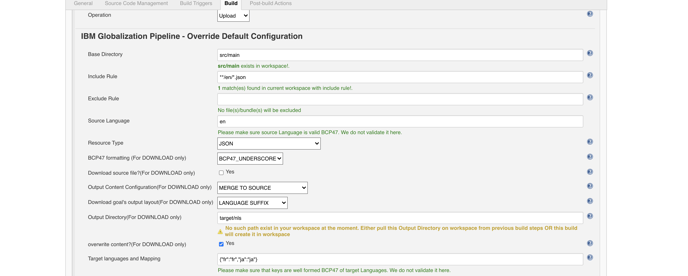
6. Add three IBM Globalization Pipeline plugin instances:
7. Save and build! Hopefully the build passed and your build console shows information about upload/download.
8. With your test GP instance, let's create a mock TR (Translation Request) on GP dashboard.
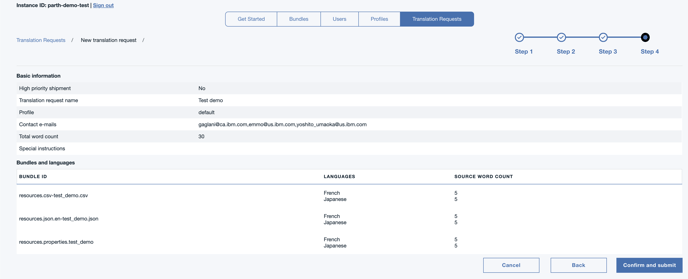
Your TR should be merged in some time since it is a mock TR.
Load Jenkins plugin on your Jenkins environment
Once you are content with the test, use that target/ibm-g11n-pipeline.hpi to update your own Jenkins environment. See these instruction on how to load this plugin on your own environment.
If you are re-installing the plugin, then:
- Note down the gp config. you will want to remove existing gp section and re-add new gp step in your Jenkins jobs after the re-installation (add configs again from your notes).
- Delete the old plugin, then install a new version.
- Changes will only take effect after the Jenkins server restarts. It usually prompts for it after installing a plugin.